Reduce, reuse, recycle. That’s what we were always told as kids. Well, now I am re-making this saying onto something that you will actually use. Today, I will give you Tutorials on how to make some awesome recycled crafts that you will actually use!
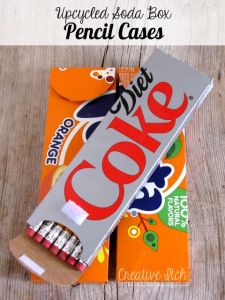
DIY Project #1 – Up cycled Soda box pencil case.
I found this cool Craft on Pinterest (Blog that made this craft – http://www.thecreativeitchboutique.blogspot.com) and thought that it looked like an easy yet useful craft. Using the template below, find a soda box or even a cereal box and you will soon have you very own soda box pencil case. *make sure that you measure to make sure that you pencils will fit into the box. Buy your pencils first and then make you box so that you can fit it to the size of your pencils.
pencibox templates – Click here to get your template for the pencil case.
DIY Project #2 – Paper Towel Roll Jewelry Holder
Keeping your jewelry from getting tangled and lost is hard to do. But this easy DIY project will keep you organized for the next little while. Simply Find Two paper towel rolls, colour, paint, bedazzle or decorate in some other way, cut one in half or quarters, cut a slot in the bottom of the other, Wedge the smaller piece into the slot and add jewelry. Tada! You have your very own Jewelry holder made by you!
DIY Project #3 – Plastic Straw Wall Art
Although this one may be a little more time consuming and difficult, it is defiantly worth the work as this wall art creation looks amazing and fits any type of décor. All you need are Plastic straws, A clothes hanger, spray paint of colours of you choice, a large sewing needle, string, Commander hooks (which can be found at your local craft store) and Wooden clothing clips. For a full tutorial, visit http://greenweddingshoes.com/diy-straw-backdrop/.
DIY Project #4 – Burnt Out Light Bulb Centerpiece
This project is simple and elegant and uses a medium that we all toss away on a monthly basis. Start by choosing out a container that is wide enough to slightly bury the bulbs in, as you only want to see the tops of the bulbs, giving it a completely spherical effect. I recommend Black, but any colour will work. Now find an even number of burnt out light bulbs that will fit into your container. I can not give you an exact number because it all depends on your container size. Now you can remove the wire on the inside or leave it in for effect. If you do decide to remove the ire, make sure that the bulb is 100% burnt out. Now, depending on your container, you can fill it up with sand, glitter, foam or anything else that will hold to bulbs upright. Stick the bulbs in to that the metal is covered but the top is still sticking out. Try to even all of the bulbs out so that they stick out at the same height. You can also spray paint the bulbs before hand to make this center piece more fun and funky, for more laid back and less fancy events.
Well that’s all for today! I hope you try out some of these awesome DIYs and come back again to see more posts from our three amazing authors! OR you could follow us using your email or WordPress account to receive updates every time we post!
Until the next time!
–Inspire


